ECE 5725 Project: Heartbeat Detection with Face Recognition
Designed by
Zhiyuan Zhang(zz565), Yuting Zhou(yz848)
Demonstration Video
Introduction
Our project aims to design a heartbeat detection system with face recognition. In our project, we identify users by face recognition and users can see past heartbeat data of his/ her own. Users register by entering his/her name and entering one hundred faces. This facial recognition function will provide safe access to the user’s data. The camera is used to detect the heartbeat by putting a finger on it. The detector will process the image, generate the heartbeat pulse, and display the heartbeat trace and rate on the pi-TFT. The program will record the history heartbeat rate and can also view real-time Electrocardiography or past ECG in this user account. We are going to use the Pygame to create the interactions with the user on the piTFT screen, where users can see the past heartbeat data.
Designing and Testing:
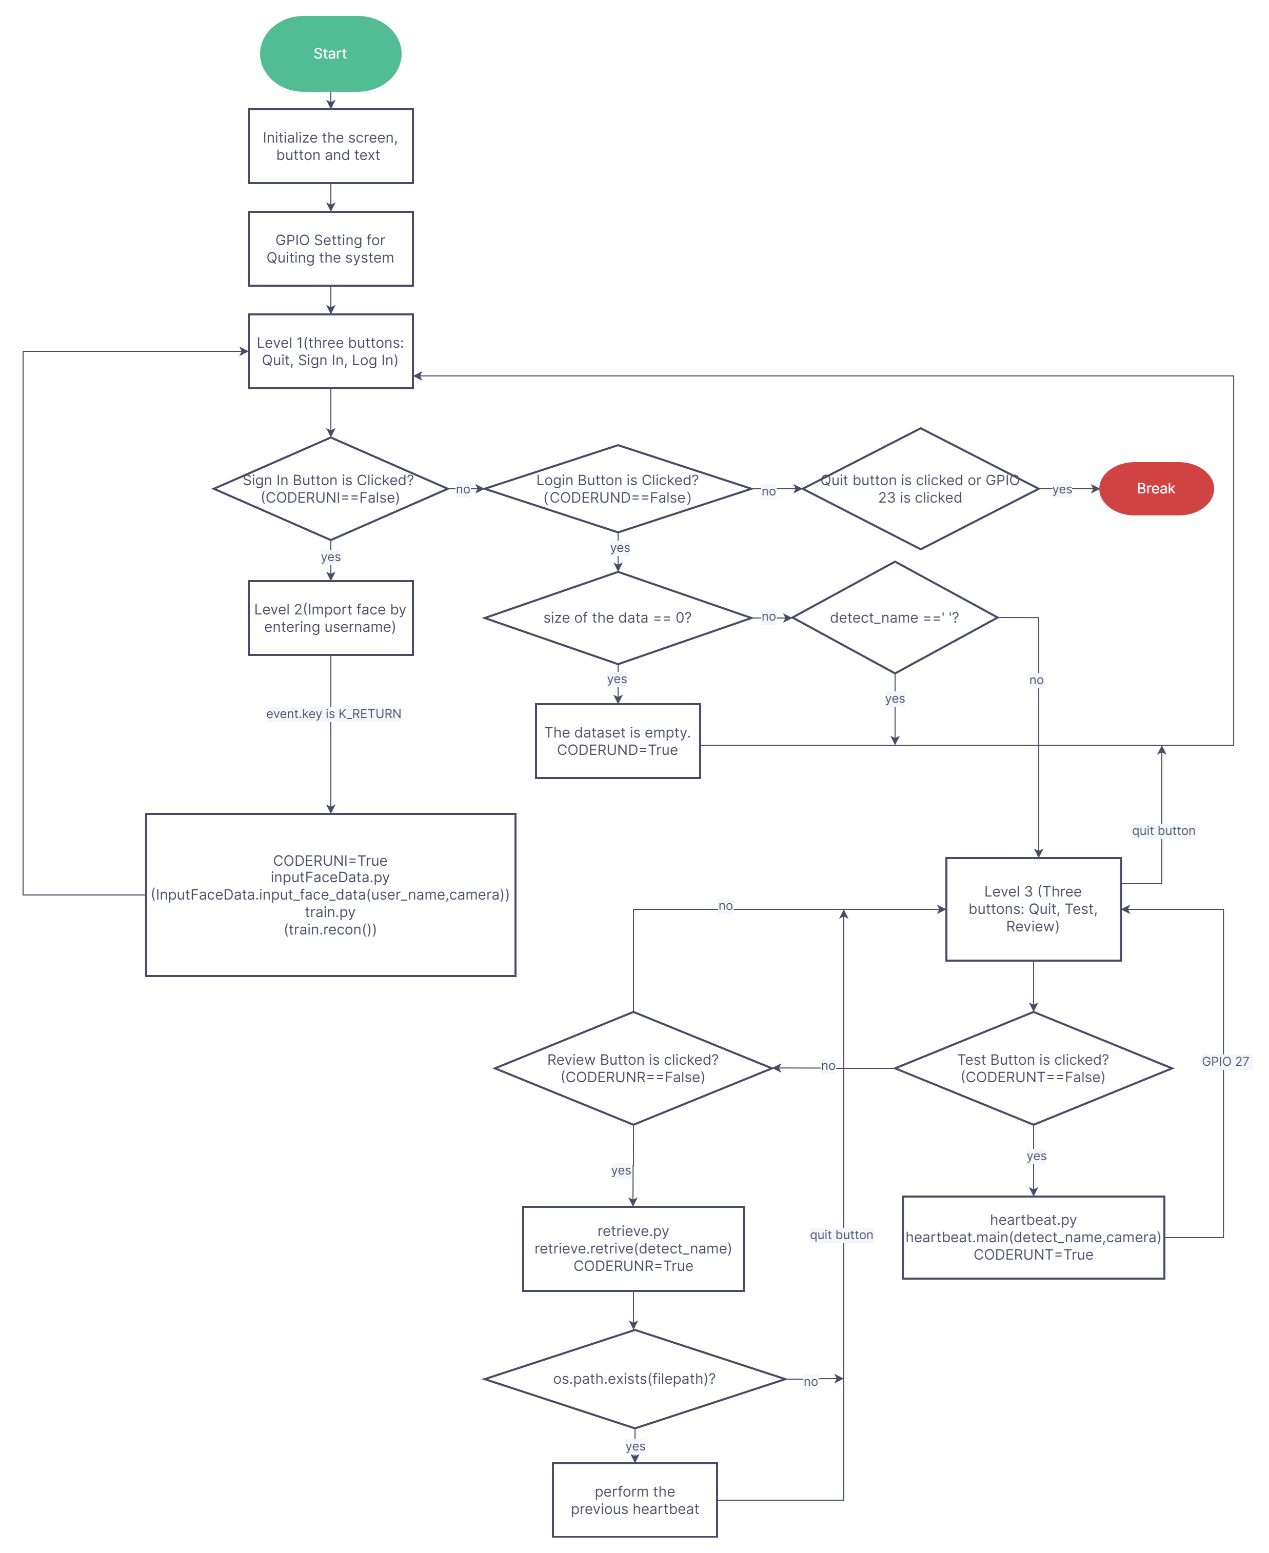
Our system has three main parts, face recognition, heartbeat detection and user interface design. The below flowchart explains the programming architecture.
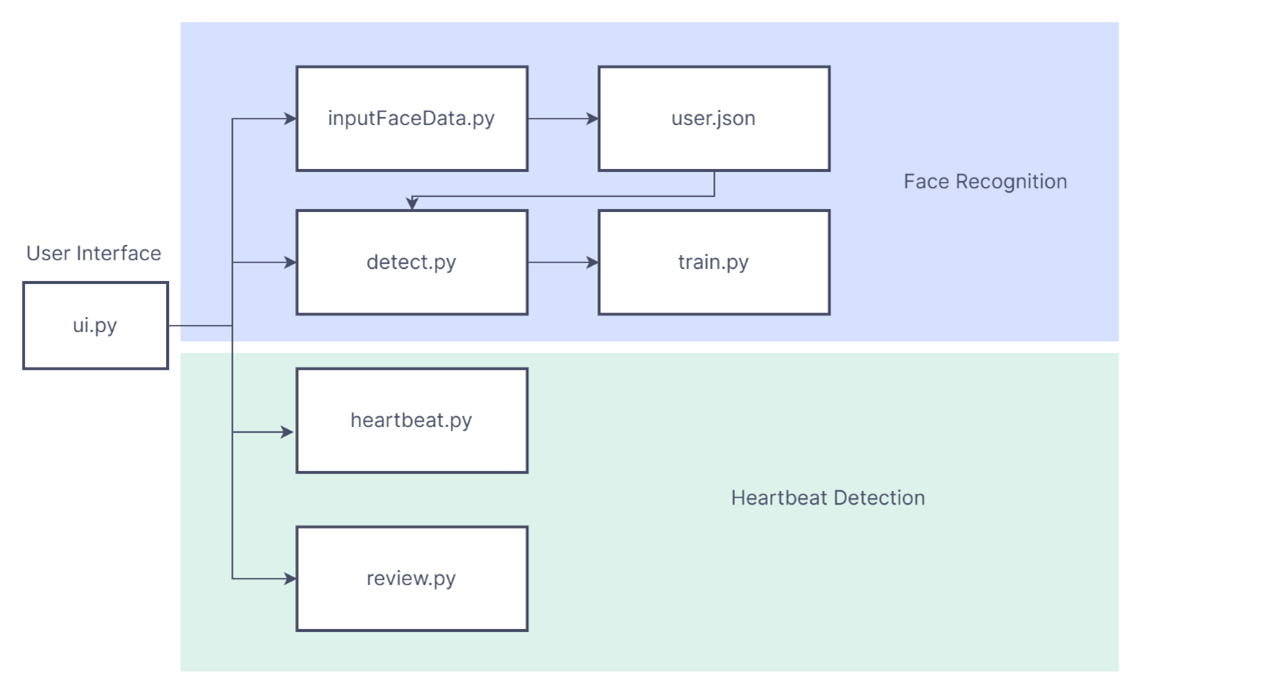
Software Flowchart
Face Recognition:
This part is divided into three parts, face data input, training, and detection. According to inputting face data, we utilize the default Haar cascade algorithm for face detection “haarcascade_frontalface_default.xml” from OpenCV to obtain the features of images. First, we need to open the “json” file to get the size of the database as an id and the input name as the username stored in the file. Secondly, we extract the frames from the camera and store them in the file named “username + the number of pictures”. Specifically, to make it easier for the user to be aware of the process of the image input, we add the process hint, I mean, if the system obtains one frame successfully, it increases the progress by 1%. In all, the system would extract 100 images to train. Based on the same function from OpenCV, we train all the images in the dataset to generate a new “yml” file. After that, the module “cv2.face” has the recognizer “LBPHFaceRecognizer_create” reading the “yml” file. We use the camera again to detect the faces. If the confidence of the face, determined by “recognizer.predict(gray[y:y+h,x:x+w])”, is less than 55 and the images satisfying the requirement are more than 10, the function will return the related name based on the “json” file. Noted that the camera could not perform on PiTFT directly just using the “os.putenv”. We could utilize the “pygame.surfarry.make_surface(img)” to display the images from the camera.
In this process, when using the steps of installing OpenCV on canvas, we could not find the file path of the algorithm file “haarcascade_frontalface_default.xml”. We tended to find the real path, which tends to be a failure because this download method does not come with these functions. What we did was download the related function in the designated folder. The face images are stored in the file named dataset, which cannot be found without setting up the file. When we recorded the face images, we could not find them in the designated path. More importantly, it cannot be ignored to back up. When testing the function, the SD card was damaged. We had to rewrite the code and were aware of the importance of backup. Most importantly, During the final integration, we found that the program often got stuck. We had to restart the Raspberry Pi. This process often left piTFT unconnected. It was necessary to replace the Raspberry Pi to reconnect. This problem was very weird and although we found a solution, we could not determine the cause of the problem. We think it may have something to do with the internal charge. Going back to the original problem, if we repeatedly ran the detect or input face method, we found that it would often get stuck. After writing separate loops to test the reason for the problem, we found that the camera could not be turned off in every internal program. This is because the camera shutdown process is far more complicated than leaving the camera on all the time. Repeatedly switching the camera on and off can cause the raspberry pi to crush. After we kept the camera on, we solved the problem.
Heartbeat Detection:
We use the camera to detect the heartbeat. The principle uses the brightness changes detected by the camera when the finger is placed on it. When the heart pushes fresh blood into the capillaries under the skin, the brightness (depth of red) will change slightly. The heartbeat can be calculated by monitoring this regularly changing interval through the camera.
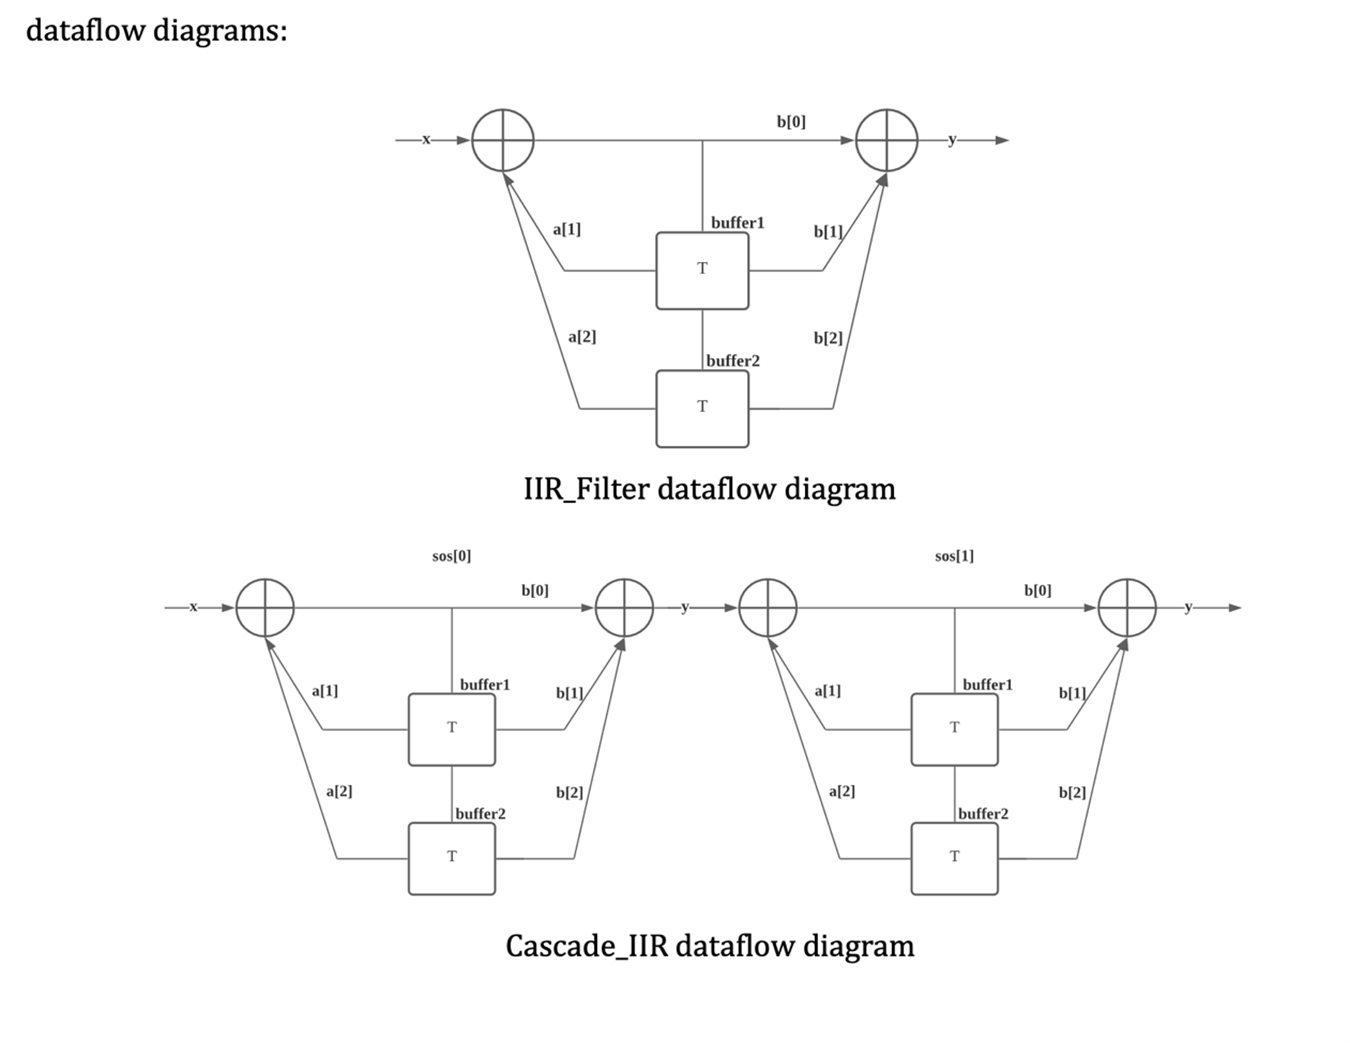
The whole process of heartbeat detection is shown in the flow chart below. First, we get a frame from the pi camera, then use get each color matrix in the NumPy array. Since the camera is using a BGR colorway, Each color (blue, green and red) ‘s mean can be calculated by calling their index and using np.mean(). Then we will use these three mean values of each color to determine if the finger is placed on the camera, if red All the process we described above will be a while loop to detect the heartbeat continually until the quit button GPIO 27 is pressed. If the user wants to quit the heartbeat detection, press the physical button GPIO 27 and will quit the heartbeat detection. Plotting the matplotlib figure on pyTFT: We use matplotlib to help us plot real-time curves like ECG because the pygame cannot plot scientific plots like this. However, using Matplotlib to plot figures will lead to another problem: How to show the plot on the pyTFT using pygame? The solution to this problem is to transfer the figure object of the matplotlibplot to string using fig.canvas.get_renderer() and raw_data=renderer().tostring_rgb() functions. Then the pygame will create the surface object from the string using pygame.image.fromstring(raw_data,size,”RGB”). Then biltting the surface on the piTFT. One thing worth noticing is that when using the matplotlib to plot the plot (canvas.fig.draw()) it will be really slow. One way to speed up the plotting process is to use the fig.canvas.blit() to only blit the new changes to the canvas and pre-draw a base canvas that contains immutable elements on the plot(For example axes, labels, etc.), in this way, the data refresh rate will be around 30 fps that approximates to the camera frame to get accurate heartbeat rate. Design of Infinite Impulse Response Filter (IIR): To filter out the desire ECG plot, we Applied IIR Filter class and Cascade IIR Filter class.The diagram below show the data flow diagram of the filters: The input data x (the mean of the red color) will follow this dataflow to calculate the filtered output yn where the buffer stores the previous data. The IIR_Filter class using the bandpass filter coefficient generated by the function: sos =signal.butter(N, [wstart, wstop], 'bandpass', output='sos'). Where the N is the order of the filter, in our program we use N=4, the wstart and wstop are the cut-off frequency. The camera is 30fps and that is our sample rate. We calculate the cutoff frequency with the equation wstart = 2 * cutoff_low / cam_fs and wstop = 2 * cutoff_high / cam_fs. Where the cutoff_low and cutoff _ high are the coefficients we tried and tested serval times to get the best filter result. In the diagram a[1], a[2], b[0], b[1], and b[2] are the corresponding to coefficients in the sos . The input data is the mean value of the red color and the output yn will be the filtered signal. The cascade IIR filter is simply cascading two IIR filters together since we apply a higher-order filter. The heart rate is calculated by the time lapse between two peaks of the ECG plot. The peaks are calculated by the function calculate_peaks() in the filter class. The idea of finding the peak is to find the data point that is larger than the previous one and the next one. Once find two peaks we calculate the time interval, and we will get the heart rate. To calculate the time interval, we use time.time() every time we find a peak and minus the previous peak time to get the time interval. The review of the previous heart rate detection: The idea is simple, we save the mean value of the red every time before the filter process and save this numpy array into .npy file using the function np.save() and retrieve the data using the np.load(). Then do the process like heartbeat detection. The user can press the Quit button on the screen to quit this review. We tend to implement the above functions in the system. In all, we design three main level pages. The first page is the main level page, which is used to login, sign in and quit. If users want to sign in the system, users should enter their name before inputting the faces from the camera. The level 2 page is used to help users to enter username. After the system detect the user successfully, the user could enter the system to detect heartbeat or review the previous heartbeat. Noted that if the dataset of face images or heartbeat information is empty, we also design the corresponding pages to remind users. Specifically, our system is based on the buttons shown on the screen, but we also need some GPIO buttons on PiTFT to achieve some functions. The below user interface logic flowchart explains the details well. During the design of UI, we also encountered some problems inevitably. First of all, some methods we can only run once, not repeatedly. Because we forget to change the judgment value back, which could not be ignored, after finishing each function. For example, if the button is pressed and the import method is run, the CODERUNI of the method will be changed to false, and when the import method is finished, we need to change the CODERUNI back to true for the next run. Furthermore, we are stuck at the beginning, probably partly because the loop does not exit, and then the next loop is nested. For example, if we called level2 in level1, then we chose to call level1 again in level2 to get back to the level1 interface. When optimizing, we return level2 method to go directly back to level1.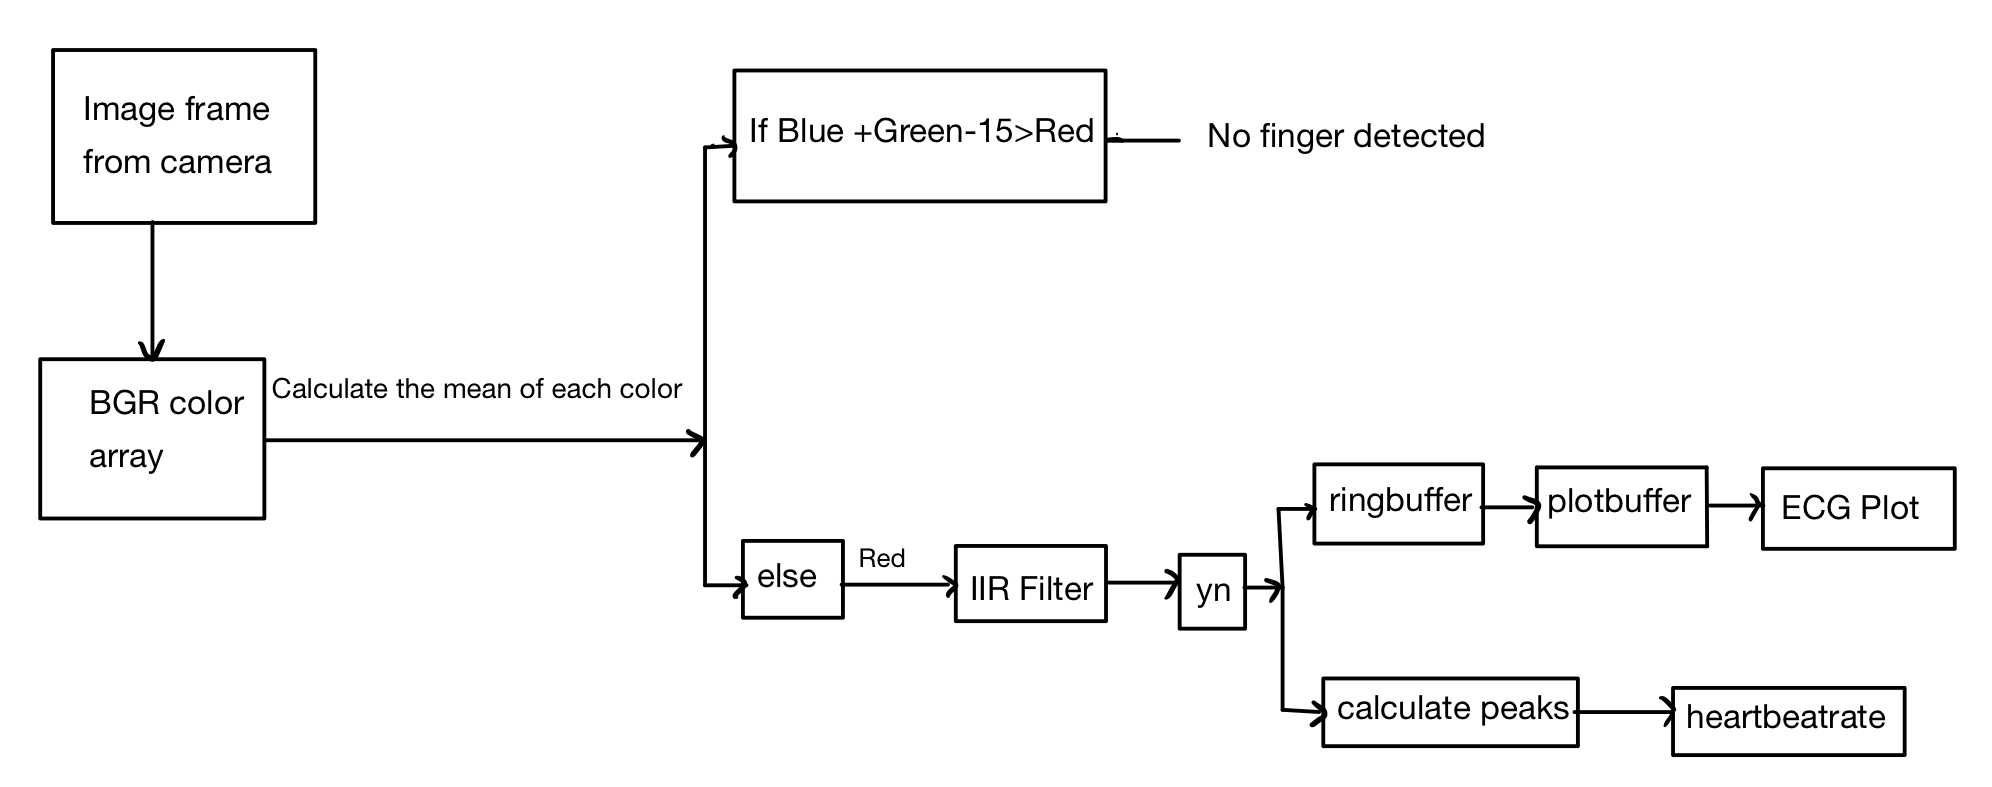
Heartbeat Detection Flowchart
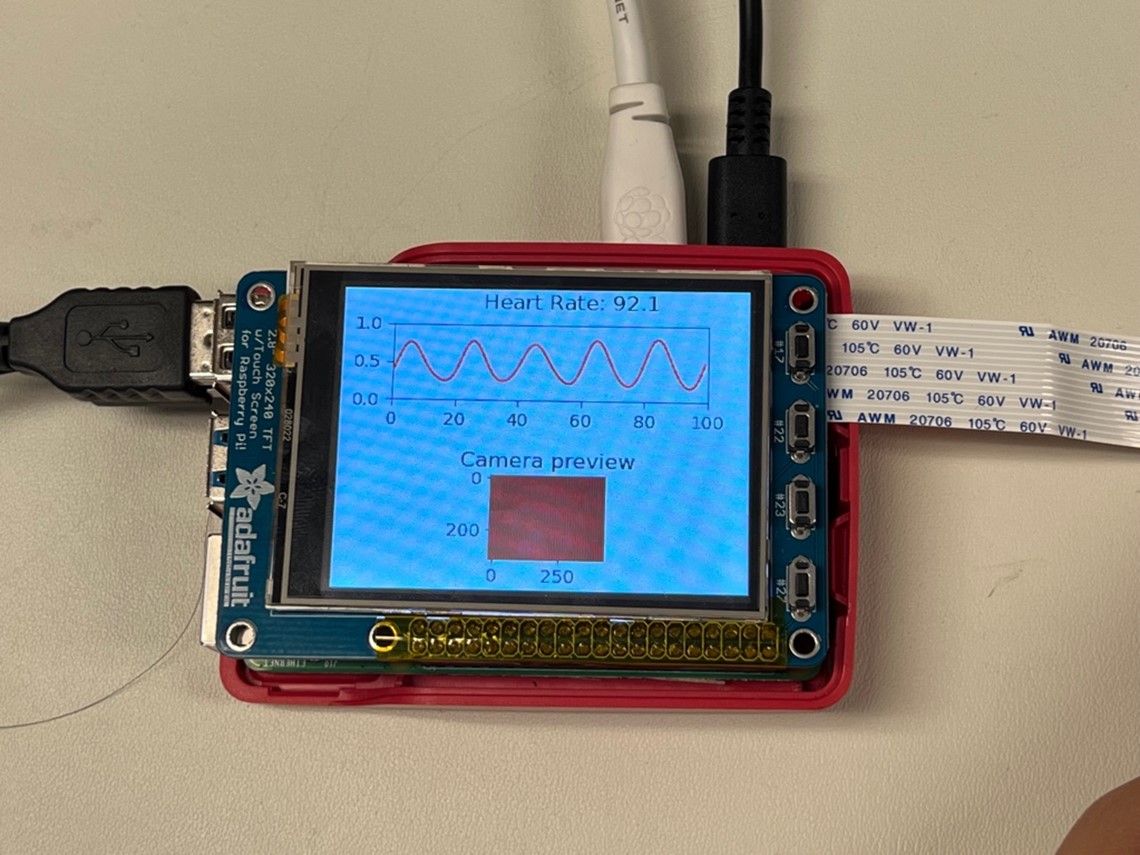
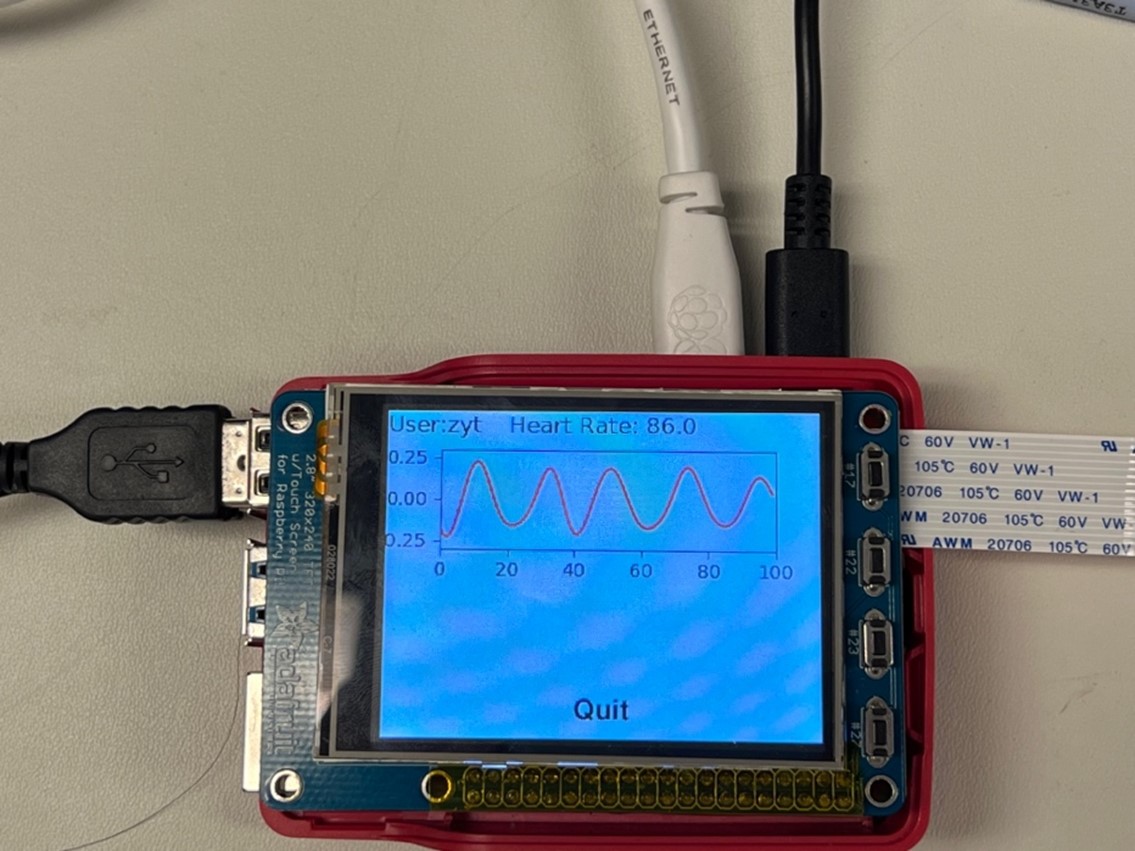
The Realtime detection of the heartbeat
The review of the previous heartbeat detection.
User Interface System:
UI Logic Flowchart
Conclusion
When the ui.py program starts to run, level 1, the main page, is displayed with three buttons, quit button to exit the system, login button to detect the face with camera and sign in button to input face image to be trained.
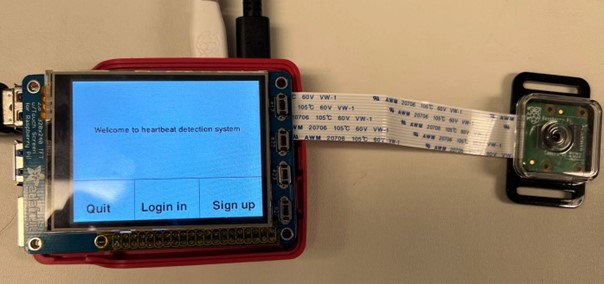
Main menu with three buttons
If the quit button or the first button in the piTFT is clicked, the system exits. If the login button is clicked without inputting any face data, it will stay in a new alert screen for five seconds, then go back to level1.
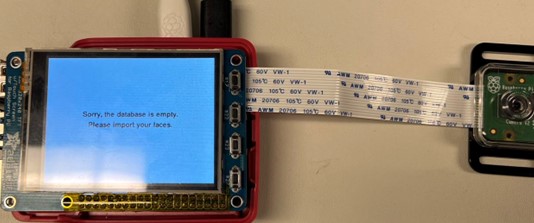
Main menu with three buttons
Clicking the sign in button, the user could enter his/her name and then input 100 face images to the system. The following three images could explain the process.

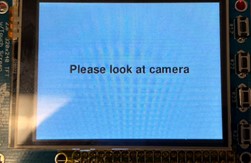
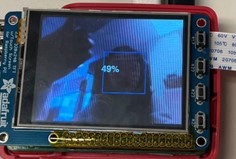
Input face images
Then pressing the login button to enter the system. If the system cannot match the user face with name, it will return to level 1. Otherwise, the user has the access to level 3. Level 3 has three buttons, quit to return to level 1, review button to review the previous heartbeat information and test button to obtain the heartbeat information through putting finger on the camera.
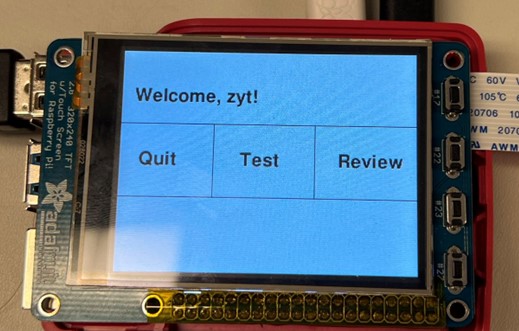
Heartbeat Detection Main Page
If the user is the first time to enter the system, the dataset cannot have the previous heartbeat data, the system will prompt the user to test the heartbeat. And when clicking the test button, the page is shown below:
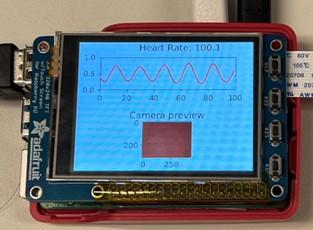
Heartbeat Detection Page
It could be stored as a npy file when pushing GPIO 27 on PiTFT. The below image shows the previous heartbeat, and the quit button could return to level 3 page.
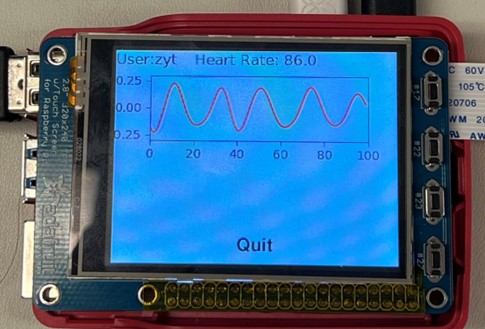
Heartbeat Review Page
Future Works
With additional time, we could improve our facial recognition algorithm by using a neural network to train the faces of the user to improve the accuracy of the detection instead of using the feature detection. Furthermore, we might add an overview section for the previous heartbeat detection review function to tell the user’s average heartbeat rate. And we considering adding a constant high light (adding a flashlight for example) for the camera to improve the detection accuracy for face recognition and the heartbeat detection. What’s more, we could make the UI design clearer and more aesthetical. According to the GPIO button, we could add more information to remind the users. Finally, the function for reviewing the heartbeat is only to quit the system. In the future, we could modify the buffer to achieve the pause, forward and backward button improve the user experience.
Work Distribution
Zhiyuan Zhang
zz565@cornell.edu
Face recognition and heartbeat recognition
Yuting Zhou
yz848@cornell.edu
Face recognition and user interface system
Parts List
- Raspberry Pi Provided in lab
- Raspberry Pi Camera V2 Provided in lab
Total: $0
References
Getting started with the Camera ModuleIIR filter principle and design
How to use the matplotlib plot in pygame
Fast matplotlib rendering using blit
How to Train your Raspberry Pi for Facial Recognition
Code Appendix
detect.py
import cv2
import numpy as np
import os
import json
import pygame
import imutils
import RPi.GPIO as GPIO
import time

pygame.init()


#color
#color definition
black=(0,0,0)
COLOR=black
white=(255,255,255)
GREEN=(0,255,0)
ORANGE=(0,126,255)
RED=(0,0,255)
YELLOW=(0,255,255)

  #PiTFT screen setting
(width, height)=(320,240)
size=(width,height)
screen = pygame.display.set_mode(size)


CODERUNDETECT = True


GPIO.setmode(GPIO.BCM)
GPIO.setup(23,GPIO.IN,pull_up_down = GPIO.PUD_UP)
def GPIO23_callback(channel):
    global CODERUNDETECT
    print("Quit!!")
    CODERUNDETECT = False
GPIO.add_event_detect(23, GPIO.FALLING, callback=GPIO23_callback, bouncetime=300)


def recon_faces(cam):
    count=0 # count the number of correct recognition

    ## create face recognizer
    recognizer = cv2.face.LBPHFaceRecognizer_create()
    recognizer.read('/home/pi/project/trained/trainer.yml')


    cascadePath = "/home/pi/data/haarcascade_frontalface_default.xml"

    with open ("/home/pi/project/user.json","r") as f:
        data=json.load(f)


    faceCascade = cv2.CascadeClassifier(cascadePath);
    font = cv2.FONT_HERSHEY_SIMPLEX
    id = 0
    t = 0
    name=''
    tempName=''


    #cam = cv2.VideoCapture(0)
    minW = 0.1 * cam.get(3)
    minH = 0.1 * cam.get(4)

    start_time = time.time()
    while (time.time() - start_time <= 30) and CODERUNDETECT:
        #t+=1
        ret, img = cam.read()
        img = cv2.flip(img, 1)
        gray = cv2.cvtColor(img, cv2.COLOR_BGR2GRAY)
        faces = faceCascade.detectMultiScale(
            gray,
            scaleFactor=1.2,
            minNeighbors=5,
            minSize=(int(minW), int(minH)),
        )
        for (x, y, w, h) in faces:
            cv2.rectangle(img, (x, y), (x + w, y + h), (0, 255, 0), 2)
            ## identify the face using the recognizer
            id, confidence = recognizer.predict(gray[y:y + h, x:x + w])
            ## set up the confidence of the detection of a face , if count >-10 we will determine the face and corresponding name
            if (confidence <55):
                if(not tempName ==data[str(id)]):
                    tempName=data[str(id)]
                    count=0
                count=count+1
                #print(count)
                if(count>=10):
                    name = data[str(id)]
                    print(name)
                    return name

        # show the camera video on the pitft
        img= cv2.cvtColor(img, cv2.COLOR_BGR2RGB)
        img = imutils.resize(img,width=320,height=240)
        img = np.rot90(img)
        surf=pygame.surfarray.make_surface(img)
        screen.fill(0)
        screen.blit(surf,(0,0))
        pygame.display.flip()

    cv2.destroyAllWindows()

    print(name)
    return name

#recon_faces()
heartbeat.py
from scipy import signal
import time
import cv2
import numpy as np
import pygame
from matplotlib import pyplot as plt
import imutils
import RPi.GPIO as GPIO


class IIR_Filter:

    def __init__(self, s):
        # Set coefficient
        self.b = [s[0], s[1], s[2]]
        self.a = [s[4], s[5]]

        self.x = [0, 0, 0]
        self.y = [0, 0, 0]

    def dofilter(self, input_single):
        self.x.insert(0, input_single)
        del self.x[-1]

        # Formula for calculating second-order IIR filter
        yn = self.b[0] * self.x[0] + self.b[1] * self.x[1] + self.b[2] * self.x[2] - self.a[0] * self.y[0] - self.a[1] * \
             self.y[1]

        self.y.insert(0, yn)
        del self.y[-1]

        return yn


class Cascade_IIR:

    def __init__(self, N, cutoff_low, cutoff_high, cam_fs):

        # Calculate coefficients of IIR
        self.N = N
        # Cut off frequency low
        wstart = 2 * cutoff_low / cam_fs
        # Cut off frequency high
        wstop = 2 * cutoff_high / cam_fs
        self.sos = signal.butter(N, [wstart, wstop], 'bandpass', output='sos')

        # Set buffer to calculate time spend between two peaks
        self.peaks_time_list = [0, 0, 0, 0, 0]
        self.peaks_list = [0, 0, 0]

        # list of IIR filter
        self.cascade = []
        for s in self.sos:
            self.cascade.append(IIR_Filter(s))

    # Do filter one by one
    def doCascadeFilter(self, v):
        for f in self.cascade:
            v = f.dofilter(v)
        return v

    # Use time difference to calculate heart rate
    def calculate_peaks(self, data):
        fs = 0
        self.peaks_list.append(data)
        del self.peaks_list[0]
        # check peaks
        if (self.peaks_list[1] > self.peaks_list[0] and self.peaks_list[1] > self.peaks_list[2]):
            peak_time = time.time()
            self.peaks_time_list.append(peak_time)
            del self.peaks_time_list[0]

            average_time = (self.peaks_time_list[-1] - self.peaks_time_list[0]) / 4
            fs = 1 / average_time
        return fs * 60


def animation():
    global plotbuffer
    global ringbuffer
    global sample_time
    global ax
    global pic
    global line
    global fig
    global bg

    sample_time = [0, 0, 0]

    # create a plot window
    fig, (ax, ax2) = plt.subplots(2)
    fig.set_size_inches(3.2, 2.4)
    pic = ax2.imshow(np.zeros((300, 400), dtype=np.uint8) * 120)
    plt.subplots_adjust(hspace=1)

    ax2.set_title("Camera preview")
    ax.set_xlim(0, 100)
    fig.canvas.draw()
    bg = fig.canvas.copy_from_bbox(fig.bbox)
    # that's our plotbuffer
    plotbuffer = np.zeros(100)

    # create an empty line
    line, = ax.plot(plotbuffer, color='red')

    # That's our ringbuffer which accumluates the samples
    ringbuffer = []

    line.set_ydata(plotbuffer)


def update(window, image, heart, finger, refres, heartrate):
    global plotbuffer, heartratestate
    global ringbuffer
    global sample_time
    global ax
    global line
    global buffer

    now_time = time.time()
    sample_time.append(now_time)
    del sample_time[0]
    image= cv2.cvtColor(image, cv2.COLOR_BGR2RGB)
    image = np.array(image)
    image = imutils.resize(image, width=90, height=90)
    image =np.rot90(image)
    image_surface = pygame.surfarray.make_surface(image)

    # add new data to the buffer
    plotbuffer = np.append(plotbuffer, ringbuffer)

    # only store the latest 100 datapoints
    plotbuffer = plotbuffer[-100:]
    ringbuffer = []

    line.set_ydata(plotbuffer)
    ax.set_ylim(min(plotbuffer) - 0.3, max(plotbuffer) + 0.3)

    fig.canvas.restore_region(bg)
    ax.draw_artist(line)
    ## update the plot
    fig.canvas.blit(fig.bbox)
    fig.canvas.flush_events()
    # Transfer the figure from matplotlib to pygame surface
    renderer = fig.canvas.get_renderer()
    raw_data = renderer.tostring_rgb()
    size = fig.canvas.get_width_height()
    surf = pygame.image.fromstring(raw_data, size, "RGB")

    window.blit(surf, (0, 0))
    window.blit(image_surface, (120, 150))
    if heartrate:
        heartratestate = heartrate
    if not finger:
        heartsurface = font.render(("Heart Rate: %s" % heartratestate), True, (0, 0, 0))
        window.blit(heartsurface, (110, 0))
    else:
        fingersurface = font.render("Please put finger on camera ", True, (0, 0, 0))
        window.blit(fingersurface, (80, 0))
        heartratestate = None
    pygame.display.flip()


def addData(v):
    # global ringbuffer
    ringbuffer.append(v)


def dataPro(data):
    global buffer
    global heartbeatbuffer
    plot_heart_rate = False
    plot_finger = False
    now_time = time.time()
    camera_real_fps = 1 / ((last_time[-1] - last_time[0]) / 9)
    #print(camera_real_fps)
    last_time.append(now_time)
    del last_time[0]
    # BGR color array
    blue = data[:, :, 0]
    blue = np.mean(blue)
    green = data[:, :, 1]
    green = np.mean(green)
    red = data[:, :, 2]
    red = np.mean(red)
    # determine if the finger is placed on camera
    if not (red > blue + green - 15):
        red = 0
        plot_finger = True

     ## doe the filter
    buffer=np.append(buffer,red)
    result = filter.doCascadeFilter(red)
    addData(result)
    # calculate the peaks
    heartRate = filter.calculate_peaks(result)
    heartbeatbuffer = np.append(heartbeatbuffer,round(heartRate))

    # Refresh data on the picture
    if (heartRate):
        plot_heart_rate = True
    return plot_heart_rate, plot_finger, round(camera_real_fps, 2), round(heartRate, 1)


def GPIO27_callback(channel):
    global CODERUNH
    print("Quit!!")
    CODERUNH = False


def main(id,camera):
    global fig
    global last_time
    global filter
    global ringbuffer
    global CODERUNH
    global font
    global heartratestate
    global buffer
    global heartbeatbuffer

    buffer= np.zeros(100)
    heartbeatbuffer=np.zeros(100)
    heartratestate = None
    CODERUNH = True
    GPIO.setmode(GPIO.BCM)
    #GPIO.release(27)
    GPIO.setup(27, GPIO.IN, pull_up_down=GPIO.PUD_UP)
    GPIO.add_event_detect(27, GPIO.FALLING, callback=GPIO27_callback, bouncetime=300)
    FPS = 60
    clock = pygame.time.Clock()
    last_time = [1, 0, 0, 0, 0, 0, 0, 0, 0, 0]
    animation()


    window = pygame.display.set_mode((320, 240))

    font = pygame.font.SysFont("DejaVu Sans", 17)

    ## This is our filter
    filter = Cascade_IIR(4, 1, 2.4, camera.get(cv2.CAP_PROP_FPS))


    while CODERUNH:
        # clock.tick(FPS)
        for event in pygame.event.get():
            if event.type == pygame.QUIT:
                run = False

        window.fill(0)
        ## get one frame form camera
        ret_val, img = camera.read()
        heart, finger, refresh, hrate = dataPro(img)
        update(window, img, heart, finger, refresh, hrate)

    # save the data for review
    filepath1 = "/home/pi/project/"+str(id)
    np.save(filepath1,buffer)
    filepath2 = "/home/pi/project/"+str(id)+"heartbeatdata"
    print("save !")
    np.save(filepath2,heartbeatbuffer)
    GPIO.cleanup()
    cv2.destroyAllWindows()
inputFaceData.py
import numpy as np
import cv2
import os
import json
import pygame
import imutils
import RPi.GPIO as GPIO

CODERUNINPUT = True

#os.putenv('SDL_VIDEODRIVER', 'fbcon') # Display on piTFT
#os.putenv('SDL_FBDEV', '/dev/fb1') #
#os.putenv('SDL_MOUSEDRV', 'TSLIB') # Track mouse clicks on piTFT
#os.putenv('SDL_MOUSEDEV', '/dev/input/touchscreen')
#pygame.init()
#pygame.display.init()
#pygame.mouse.set_visible(False)

#color
#color definition
black=(0,0,0)
COLOR=black
WHITE=(255,255,255)
GREEN=(0,255,0)
ORANGE=(0,126,255)
RED=(0,0,255)
YELLOW=(0,255,255)

  #PiTFT screen setting
(width, height)=(320,240)
size=(width,height)
screen = pygame.display.set_mode(size)

GPIO.setmode(GPIO.BCM)
GPIO.setup(22,GPIO.IN,pull_up_down = GPIO.PUD_UP)
def GPIO17_callback(channel):
    global CODERUNINPUT
    print("Quit by Bail-out button!!!")
    CODERUNINPUT = False
GPIO.add_event_detect(22, GPIO.FALLING, callback=GPIO17_callback, bouncetime=300)


def input_face_data(name,camera):
    #camera = cv2.VideoCapture(0)
    #default size

    face_detector = cv2.CascadeClassifier("/home/pi/data/haarcascade_frontalface_default.xml")

    #name = "zz"#input("Enter name:")
    with open ("/home/pi/project/user.json","r") as f:
        data=json.load(f)
    id=len(data)+1
    data[id]=name

    font = cv2.FONT_HERSHEY_SIMPLEX

    with open ("/home/pi/project/user.json","w") as w:
        json.dump(data,w)


    print("record picture...")
    pic_count = 0 #count pgm file
    while CODERUNINPUT :
        ret,frame = camera.read()
        frame = cv2.flip(frame, 1)  # flip
        frame=np.array(frame)
        gray = cv2.cvtColor(frame, cv2.COLOR_BGR2GRAY)
        faces = face_detector.detectMultiScale(gray, 1.2, 6)
        for (x,y,w,h) in faces:
            pic_count+=1
            cv2.rectangle(frame,(x,y),(x+w,y+h),(255,0,0),2)
            cv2.imwrite("/home/pi/project/dataset/"+str(id)+"_"+str(pic_count)+".pgm",gray[y:y+h,x:x+w])
            #cv2.putText(frame, str(pic_count), (x + 5, y - 5), font, 1, (255, 255, 255), 2)
            #cv2.imshow('image', frame)


            frame= cv2.cvtColor(frame, cv2.COLOR_BGR2RGB)
            frame = imutils.resize(frame,width=320,height=240)
            frame = np.array(np.rot90(frame))


            surf=pygame.surfarray.make_surface(frame)
            screen.fill(black)
            screen.blit(surf,(0,0))

            #info
            info_font = pygame.font.Font(None, 30)
            info = str(pic_count) + "%"
            info_text_surface = info_font.render(info, True, WHITE)
            info_rect = info_text_surface.get_rect(center=(160,120))
            screen.blit(info_text_surface, info_rect)

            pygame.display.flip()
            print("record "+str(pic_count)+" picture")
            k = cv2.waitKey(100) & 0xff  # Press 'ESC' for exiting video
        c = cv2.waitKey(10)
        if c == 27:  # ESC
            break
        elif pic_count>=100:
            print("end")
            break
    #camera.release()
    cv2.destroyAllWindows()

#input_face_data("zyt")
retrieve.py
import numpy as np

import random
from scipy import signal
import time

import numpy as np
import pygame
from matplotlib import pyplot as plt
import os
import time


# Environment Seting
#os.putenv('SDL_VIDEODRIVER', 'fbcon') # Display on piTFT
#os.putenv('SDL_FBDEV', '/dev/fb1') #
#os.putenv('SDL_MOUSEDRV', 'TSLIB') # Track mouse clicks on piTFT
#os.putenv('SDL_MOUSEDEV', '/dev/input/touchscreen')


window_size = 100
CODERUNRE=True
#CODERUNP = True
i=0

class IIR_Filter:

    def __init__(self, s):
        # Set coefficient
        self.b = [s[0], s[1], s[2]]
        self.a = [s[4], s[5]]

        self.x = [0, 0, 0]
        self.y = [0, 0, 0]

    def dofilter(self, input_single):
        self.x.insert(0, input_single)
        del self.x[-1]

        # Formula for calculating second-order IIR filter
        yn = self.b[0] * self.x[0] + self.b[1] * self.x[1] + self.b[2] * self.x[2] - self.a[0] * self.y[0] - self.a[1] * \
             self.y[1]

        self.y.insert(0, yn)
        del self.y[-1]

        return yn


class Cascade_IIR:

    def __init__(self, N, cutoff_low, cutoff_high, cam_fs):

        # Calculate coefficients of IIR
        self.N = N
        # Cut off frequency low
        wstart = 2 * cutoff_low / cam_fs
        # Cut off frequency high
        wstop = 2 * cutoff_high / cam_fs
        self.sos = signal.butter(N, [wstart, wstop], 'bandpass', output='sos')

        # Set buffer to calculate time spend between two peaks
        self.peaks_time_list = [0, 0, 0, 0, 0]
        self.peaks_list = [0, 0, 0]

        # list of IIR filter
        self.cascade = []
        for s in self.sos:
            self.cascade.append(IIR_Filter(s))

    # Do filter one by one
    def doCascadeFilter(self, v):
        for f in self.cascade:
            v = f.dofilter(v)
        return v

    # Use time difference to calculate heart rate
    def calculate_peaks(self, data):
        fs = 0
        self.peaks_list.append(data)
        del self.peaks_list[0]
        # check peaks
        if (self.peaks_list[1] > self.peaks_list[0] and self.peaks_list[1] > self.peaks_list[2]):
            peak_time = time.time()
            self.peaks_time_list.append(peak_time)
            del self.peaks_time_list[0]

            average_time = (self.peaks_time_list[-1] - self.peaks_time_list[0]) / 4
            fs = 1 / average_time
        return fs * 60


def check_quitR_button_press(position):
    x,y = position
    # Check if the touch position is in the button area
    if (x < 210 and x > 110):
        global CODERUNRE
        CODERUNRE = False
        print("Quit!!!")


def retrieve(id):
    #heartbuffer=[]
    #CODERUNRE = True
    plotbuffer = np.zeros(100)
    ringbuffer=[]
    heartratestate=0
    window = pygame.display.set_mode((320, 240))
    font = pygame.font.SysFont("DejaVu Sans", 17)
    window_size = 100
    filepath = "/home/pi/project/"+str(id)+".npy"
    if(not os.path.exists(filepath)) :
        start_time = time.time()
        while (time.time() - start_time <= 5):
                    window.fill((255,255,255))
                    text_font = pygame.font.Font(None, 20)
                    info_text8="There is no previous data."
                    info_text9="Please detect heartbeat."
                    info_text8_surface = text_font.render(info_text8, True, (0,0,0))
                    info_text8_rect = info_text8_surface.get_rect(center=(160,110))
                    info_text9_surface = text_font.render(info_text9, True, (0,0,0))
                    info_text9_rect = info_text9_surface.get_rect(center=(160,120))
                    window.blit(info_text8_surface, info_text8_rect)
                    window.blit(info_text9_surface, info_text9_rect)
                    pygame.display.flip()
        return
    data=np.load(filepath)
    size=data.size
    filepath1 = "/home/pi/project/"+str(id)+"heartbeatdata.npy"
    heartbeat = np.load(filepath1)
    # create a plot window
    fig, (ax,ax2) = plt.subplots(2)

    fig.set_size_inches(3.2, 2.4)
   # ax2.get_xaxis().set_visible(False)
    #ax2.get_yaxis().set_visible(False)
    ax2.set_axis_off()
    plt.subplots_adjust(hspace=0.5)

    # ax.text(0.5, -0.5, '*Please tap the camera (not too hard)', horizontalalignment='center',
    #         verticalalignment='center', transform=ax.transAxes, color="orange")

    ax.set_xlim(0, 100)
    ax.set_ylim(min(plotbuffer) - 0.3, max(plotbuffer) + 0.3)
    fig.canvas.draw()
    bg = fig.canvas.copy_from_bbox(fig.bbox)
    # that's our plotbuffer

    # BUTTON


    fontB = pygame.font.Font(None, 30)
    retrieve_buttons_dic = {"Quit":(160, 220)}


    # create an empty line
    line, = ax.plot(plotbuffer, color='red')
    line.set_ydata(plotbuffer)

    global i,CODERUNRE
    clock = pygame.time.Clock()

    filter = Cascade_IIR(4, 1, 2.4, 30)


    while CODERUNRE:


        pygame.time.delay(20)
        result = filter.doCascadeFilter(data[i])
        ringbuffer.append(result)

        plotbuffer = np.append(plotbuffer,ringbuffer)

        plotbuffer=plotbuffer[-100:]
        ringbuffer=[]

        if heartbeat[i]:
          heartratestate = heartbeat[i]

        heartsurface = font.render(("Heart Rate: %s" % heartratestate), True, (0, 0, 0))
        useridsurface= font.render(("User:%s" %id),True,(0,0,0))
        line.set_ydata(plotbuffer)
        ax.set_ylim(min(plotbuffer) - 0.3, max(plotbuffer) + 0.3)

        fig.canvas.restore_region(bg)

        ax.draw_artist(line)

        fig.canvas.blit(fig.bbox)
        fig.canvas.flush_events()
        renderer = fig.canvas.get_renderer()
        raw_data = renderer.tostring_rgb()
        size = fig.canvas.get_width_height()
        surf = pygame.image.fromstring(raw_data, size, "RGB")

        window.blit(surf, (0, 0))
        window.blit(heartsurface,(90,0))
        window.blit(useridsurface,(0,0))

        #screen.fill(WHITE)
          # Draw Buttons
        for text, center in retrieve_buttons_dic.items():
          text_surface = fontB.render(text , True, (0,0,0))
          rect = text_surface.get_rect(center=center)
          window.blit(text_surface, rect)


        pygame.display.flip()
        for event in pygame.event.get():
            if(event.type is pygame.MOUSEBUTTONDOWN):
                pass
            #on mouse press
            elif(event.type is pygame.MOUSEBUTTONUP):
                touch_position = pygame.mouse.get_pos()
                print(touch_position)
                check_quitR_button_press(touch_position)


        #print(CODERUNRE)
        i = i + 1
        if(i>=data.size):
            i=data.size-1


    CODERUNRE = True


#if __name__ == '__main__':

#  pygame.init()
 # retrieve("zzy")
train.py
import numpy as np
from PIL import Image
import os
import cv2
def recon():
    path = '/home/pi/project/dataset/'


    recognizer = cv2.face.LBPHFaceRecognizer_create()

    detector = cv2.CascadeClassifier("/home/pi/data/haarcascade_frontalface_default.xml");


    def getImagesAndLabels(path):
        imagePaths = [os.path.join(path, f) for f in os.listdir(path)]
        faceSamples = []
        ids = []
        for imagePath in imagePaths:
            PIL_img = Image.open(imagePath).convert('L')
            img_numpy = np.array(PIL_img, 'uint8')
            id = int(os.path.split(imagePath)[-1].split("_")[0])
            faces = detector.detectMultiScale(img_numpy)
            for (x, y, w, h) in faces:
                faceSamples.append(img_numpy[y:y + h, x:x + w])
                ids.append(id)
        return faceSamples, ids


    print("\n [INFO] Training faces. It will take a few seconds. Wait ...")
    faces, ids = getImagesAndLabels(path)
    recognizer.train(faces, np.array(ids))

    recognizer.write('/home/pi/project/trained/trainer.yml')
    print("\n [INFO] {0} faces trained. Exiting Program".format(len(np.unique(ids))))
ui.py
##Yuting Zhou yz848
##Zhiyuan Zhang zz565
##lab2 22 Sep 2022
import os
os.putenv('SDL_VIDEODRIVER', 'fbcon') # Display on piTFT
os.putenv('SDL_FBDEV', '/dev/fb1') #
os.putenv('SDL_MOUSEDRV', 'TSLIB') # Track mouse clicks on piTFT
os.putenv('SDL_MOUSEDEV', '/dev/input/touchscreen')
from pygame.locals import *
import RPi.GPIO as GPIO
import pygame
import time

import numpy
import inputFaceData
from detect import recon_faces
import train
import heartbeat
import json
import retrieve
import cv2

# Global Flag
CODERUN = True #for main
CODERUND = True #for detecting
CODERUNI= True #for importing

CODERUN3 = True #for main
CODERUNT = True #for testing heartbeat
CODERUNR= True #for reviewing the previous information

detect_name=""


# Init Pygame
pygame.init()
pygame.mouse.set_visible(False)
size = (width, height) = (320, 240)
screen = pygame.display.set_mode(size)


##FPS = 60
clock = pygame.time.Clock()
WHITE = 255,255,255
BLACK = 0,0,0
screen.fill(WHITE)


# Button Configuration
font = pygame.font.Font(None, 30)
text_font = pygame.font.Font(None, 20)
level1_buttons_dic = {"Sign up":(270, 220), "Login in": (150,220),"Quit": (40, 220)}

level3_buttons_dic = {"Review":(270, 120), "Test": (150,120),"Quit": (40, 120)}

# Text Configuration
info_text1="Welcome to heartbeat detection system"
info_text1_surface = text_font.render(info_text1, True, BLACK)
info_text1_rect = info_text1_surface.get_rect(center=(160,85))

info_text2="Input your name:"
info_text2_surface = font.render(info_text2, True, BLACK)
info_text2_rect = info_text2_surface.get_rect(center=(160,80))

info_text3="Please look at camera"
info_text3_surface = font.render(info_text3, True, BLACK)
info_text3_rect = info_text3_surface.get_rect(center=(160,120))

info_text4="Sorry, the system cannot detect you."
info_text4_surface = text_font.render(info_text4, True, BLACK)
info_text4_rect = info_text4_surface.get_rect(center=(160,120))

info_text6="Sorry, the database is empty."
info_text6_surface = text_font.render(info_text6, True, BLACK)
info_text6_rect = info_text6_surface.get_rect(center=(160,110))

info_text7="Please import your faces."
info_text7_surface = text_font.render(info_text7, True, BLACK)
info_text7_rect = info_text7_surface.get_rect(center=(160,130))

user_name_info = ""
user_surface = font.render(user_name_info, True, BLACK)
user_rect = user_surface.get_rect(center=(120,150))
color_active = pygame.Color('lightskyblue3')
color_passive = pygame.Color('chartreuse4')
color = color_passive
active = False


# GPIO Setting
GPIO.setmode(GPIO.BCM)
GPIO.setup(17,GPIO.IN,pull_up_down = GPIO.PUD_UP)
def GPIO17_callback(channel):
    global CODERUN
    print("Quit!!")
    CODERUN = False
    print("Quit Game!!!")

GPIO.add_event_detect(17, GPIO.FALLING, callback=GPIO17_callback, bouncetime=300)

def check_quit_button_press(position):
    x,y = position
    # Check if the touch position is in the button area
    if (x < 60 and x > 20 and y>200):
        global CODERUN
        CODERUN = False
        print("Quit Game!!!")

def check_detect_button_press(position):
    x,y = position
    # Check if the touch position is in the button area
    if (x < 180 and x > 120 and y>200):
        global CODERUND
        CODERUND = False
        print("Detect face!!!")


def check_import_button_press(position):
    x,y = position
    # Check if the touch position is in the button area
    if (x < 290 and x > 250 and y>200):
        global CODERUNI
        CODERUNI = False
        print("Import face!!!")


def check_quitlevel3_button_press(position):
    x,y = position
    # Check if the touch position is in the button area
    if  (x < 60 and x > 20 and y<160 and y>80):
        global CODERUN3
        CODERUN3 = False
        print("Quit Game!!!")

def check_test_button_press(position):
    x,y = position
    # Check if the touch position is in the button area
    if  (x < 180 and x > 120 and y<160 and y>80):
        global CODERUNT
        CODERUNT = False
        print("test!!")


def check_review_button_press(position):
    x,y = position
    # Check if the touch position is in the button area
    if (x < 290 and x > 250 and y<160 and y>80):
        global CODERUNR
        CODERUNR = False
        print("review!!")


def level1() :


    global CODERUN, CODERUND, CODERUNI ,CODERUN3, detect_name
    cam = cv2.VideoCapture(0)
    start_time = time.time()
    while (time.time() - start_time <= 360) and CODERUN:
        screen.fill(WHITE)
          # Draw Buttons
        for text, center in level1_buttons_dic.items():
          text_surface = font.render(text , True, BLACK)
          rect = text_surface.get_rect(center=center)
          screen.blit(text_surface, rect)

    #Draw text

        screen.blit(info_text1_surface, info_text1_rect)
        pygame.draw.line(screen,BLACK,(0,170),(320,170))
        pygame.draw.line(screen,BLACK,(100,170),(100,320))
        pygame.draw.line(screen,BLACK,(210,170),(210,320))
        pygame.display.flip()


        for event in pygame.event.get():
            if(event.type is MOUSEBUTTONDOWN):
                pass
            #on mouse press
            elif(event.type is MOUSEBUTTONUP):
                touch_position = pygame.mouse.get_pos()
                print(touch_position)
                check_quit_button_press(touch_position)
                check_detect_button_press(touch_position)
                check_import_button_press(touch_position)
                if(not CODERUNI) :
                    print("import")
                    level2(cam)


                if(not CODERUND) :
                    print("detect")

                    with open ("/home/pi/project/user.json","r") as f:
                       data=json.load(f)
                    if(len(data)==0):
                        CODERUND = True

                        while (time.time() - start_time <= 5):

                               screen.fill(WHITE)
                               screen.blit(info_text6_surface, info_text6_rect)
                               screen.blit(info_text7_surface, info_text7_rect)
                               pygame.display.flip()


                    else:
                        detect_name=recon_faces(cam)
                        print(detect_name)
                        CODERUND = True
                        if(detect_name==''):

                        #CODERUN=True

                            start_time = time.time()
                            while (time.time() - start_time <= 5):
                               screen.fill(WHITE)
                               screen.blit(info_text4_surface, info_text4_rect)
                               pygame.display.flip()


                        else:
                            level3(detect_name,cam)
                            if(not CODERUN3):
                              CODERUN3 = True
                              detect_name=""


    cam.release()

def level2(cam) :

    screen.fill(WHITE)

    global color,active,user_name_info,user_surface,user_rect,CODERUNI,info_text3,info_text3_surface, info_text3_rect

    user_name_info = ""

    #pygame.display.flip()

    start_time = time.time()

    screen.blit(info_text2_surface, info_text2_rect)
    pygame.display.flip()

    while (time.time() - start_time <= 360 and CODERUN and not CODERUNI):

        #touch_position = None

        for event in pygame.event.get():
            if(event.type is MOUSEBUTTONDOWN):
                if user_rect.collidepoint(event.pos):
                    active = True
                else:
                    active = False

            if(event.type is KEYDOWN):
                if (event.key is K_BACKSPACE):
                    user_name_info = user_name_info[:-1]
                elif (event.key is K_RETURN):
                    print(user_name_info)
                    CODERUNI = True

                    screen.fill(WHITE)
                    screen.blit(info_text3_surface, info_text3_rect)
                    pygame.display.flip()
                    inputFaceData.input_face_data(user_name_info,cam)
                    info_text3_surface=""
                    info_text3_surface = font.render(info_text3, True, BLACK)
                    info_text3_rect = info_text3_surface.get_rect(center=(300,80))

                    train.recon()

                    user_name_info=""
                    user_surface = font.render(user_name_info, True, BLACK)
                    user_rect = user_surface.get_rect(center=(120,150))
                    #level1()

                    break


                else:
                    user_name_info += event.unicode

        if active:
            color=color_active
        else:
            color=color_passive
        if not CODERUNI:
          pygame.draw.rect(screen,color,user_rect)

          user_surface = font.render(user_name_info, True, BLACK)
          user_rect = user_surface.get_rect(center=(120,150))

        #screen.blit(user_surface,(user_rect.x+5, user_rect.y+5))
          screen.blit(user_surface,(user_rect.x,user_rect.y))
          #user_rect.w = max(100, user_surface.get_width()+10)
          pygame.display.flip()


def level3(detect_name,cam):
    #print(str(detect_name)+"!!")


    global CODERUNT, CODERUNR


    start_time = time.time()
    while (time.time() - start_time <= 360) and CODERUN3:
        screen.fill(WHITE)


        CODERUNT = True

        info_text5="Welcome, " + str(detect_name)+"!"
        info_text5_surface = font.render(info_text5, True, BLACK)
        info_text5_rect = info_text5_surface.get_rect(center=(80,50))
        screen.blit(info_text5_surface,info_text5_rect)


    # Draw Buttons
        for text, center in level3_buttons_dic.items():
          text_surface = font.render(text , True, BLACK)
          rect = text_surface.get_rect(center=center)
          screen.blit(text_surface, rect)


        pygame.draw.line(screen,BLACK,(0,80),(320,80))
        pygame.draw.line(screen,BLACK,(100,80),(100,160))
        pygame.draw.line(screen,BLACK,(210,80),(210,160))
        pygame.draw.line(screen,BLACK,(0,160),(320,160))

        pygame.display.flip()


        for event in pygame.event.get():
            if(event.type is MOUSEBUTTONDOWN):
                pass
            #on mouse press
            elif(event.type is MOUSEBUTTONUP):
                touch_position2 = pygame.mouse.get_pos()
                print(touch_position2)
                check_quitlevel3_button_press(touch_position2)
                check_review_button_press(touch_position2)
                check_test_button_press(touch_position2)

                if(not CODERUNT) :
                    print("TEST")
                    heartbeat.main(detect_name,cam)
                    CODERUNT=True


                if(not CODERUNR) :
                    print("REVIEW")
                    retrieve.retrieve(detect_name)
                    CODERUNR=True


if __name__ == "__main__":
    level1()